Blog

Slow Cooker Halloween Stuffed Peppers

Jump to Recipe

Aka…spooky peppers. Yes, they were pretty scary alright.

For those of you who know me, you’ll know I love cute food. Give me a theme and like a person who dresses up at parties, I create cute food. What can I say? It’s ridiculous and brings a smile to my face. Someone once accused me of showing off, which actually hurt my feelings because I was having a good time just for being me. Can I help it if I made chocolate dipped strawberry footballs for the Super Bowl?

So it comes to no surprise when I decided to make something Halloween-y. I wanted to avoid making a dessert so I pondered on what dish I could make that is both cute and scary, without being disgusting. Stuffed orange peppers popped into my mind. I have no idea what inspired me.

First, I looked for a stuffed pepper recipe with an Italian bent. I also wanted to be able to make something that I wouldn’t have to babysit…the slow cooker! I didn’t find exactly what I was looking for, but close enough. I came across Crock-Pot Stuffed Peppers from Delish.

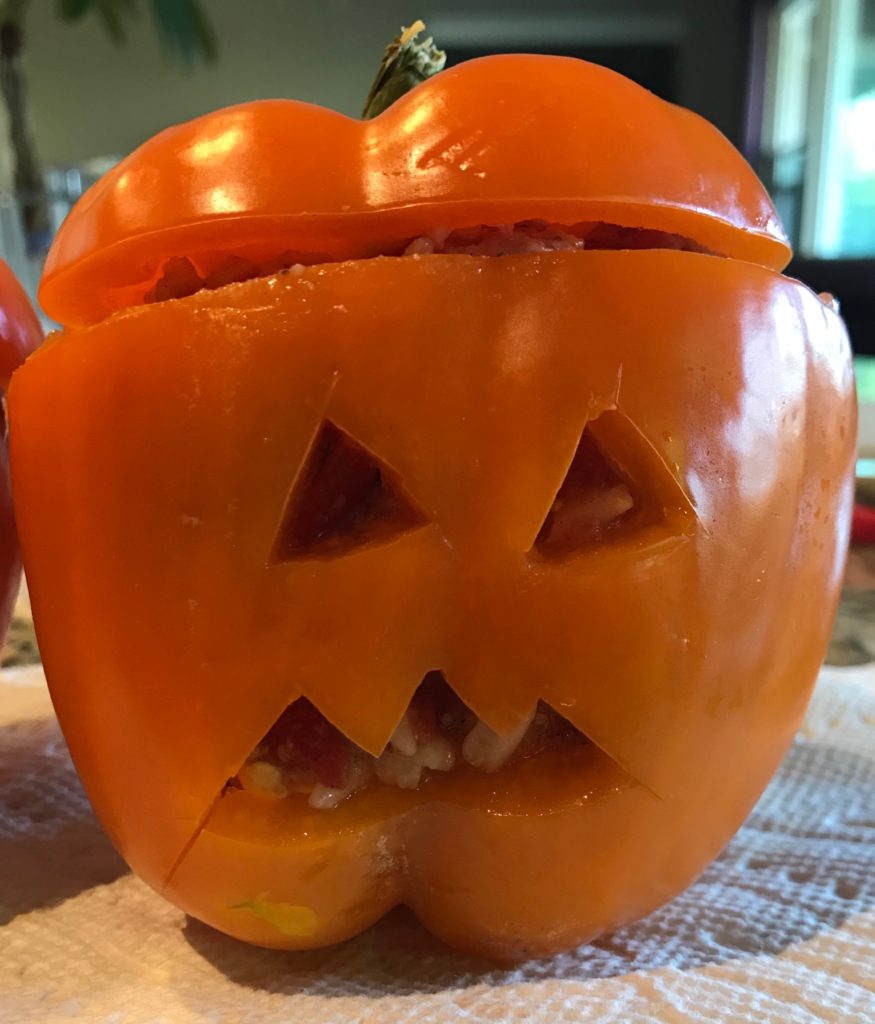
Take four orange peppers, slice off the tops, keeping the green stem intact. With a small, sharp knife, carve jack o’ lantern faces. Here’s an example of one of the scary dudes.

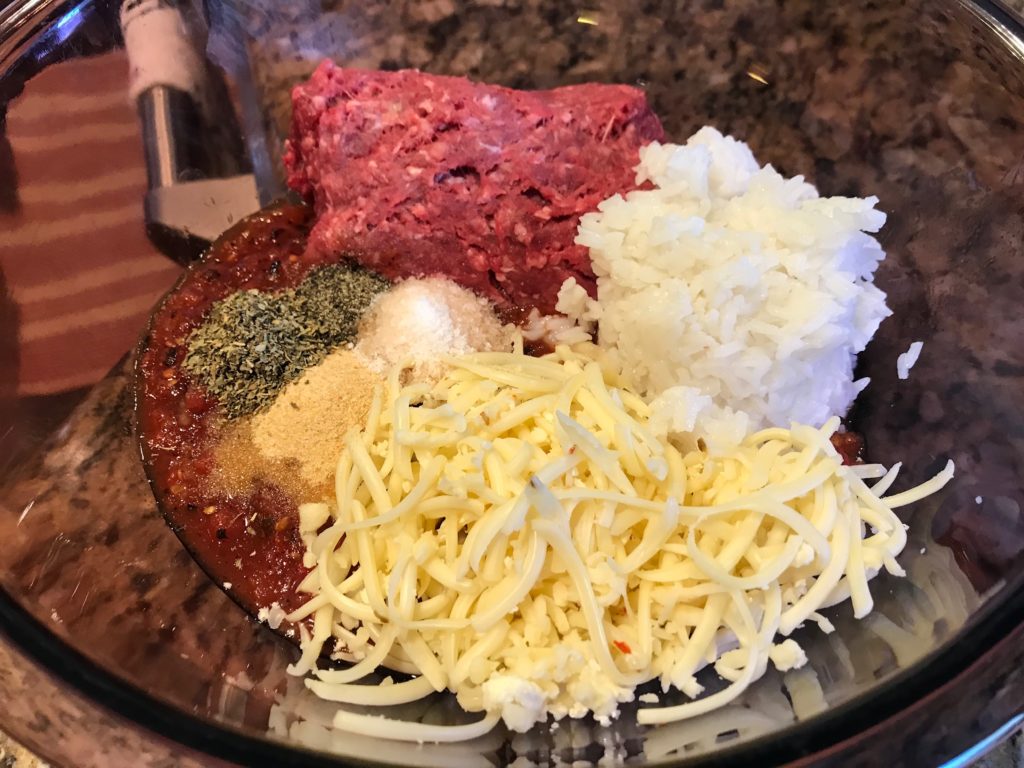
Because the original recipe was inspired by Mexican flavors and I wanted Italian, I skipped the black beans and frozen corn, and substituted Italian seasonings instead of cumin, chili powder, and oregano. I also bumped up the amount of garlic powder used.

I recommend using lean or extra-lean ground beef to avoid the grease. I prefer a 90/10 or 93/7 blend instead of a 80/20 blend, which is better for grilling cheeseburgers. If you have no idea what I’m talking about, the next time you buy ground beef, look at the package. Ground beef is measured by the lean-to-fat ratio. 80/20 means that 80% lean to 20% fat. The more fat, the more flavor. Sometimes that’s a good thing, but not when you end up with a oily mess because the fat has melted into a pool of grease.

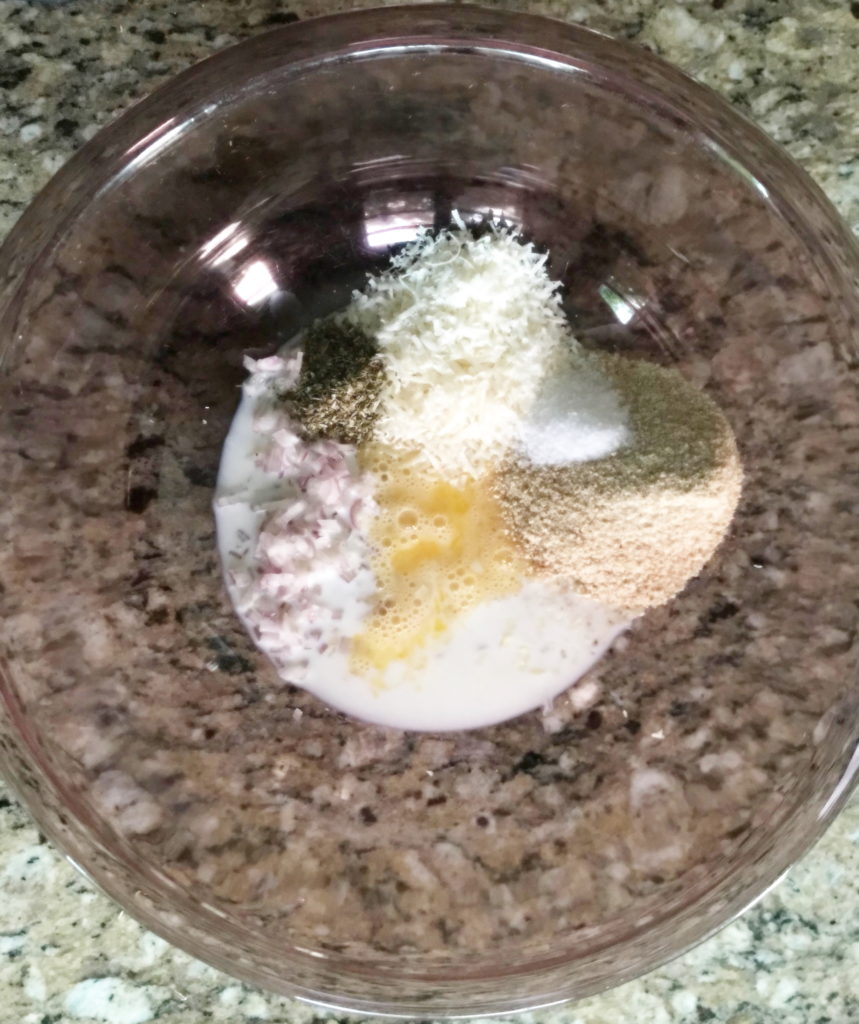
Mix all your stuffing ingredients together.

Use a spoon to scoop into your cute little pumpkins. Ohhhh…scary!

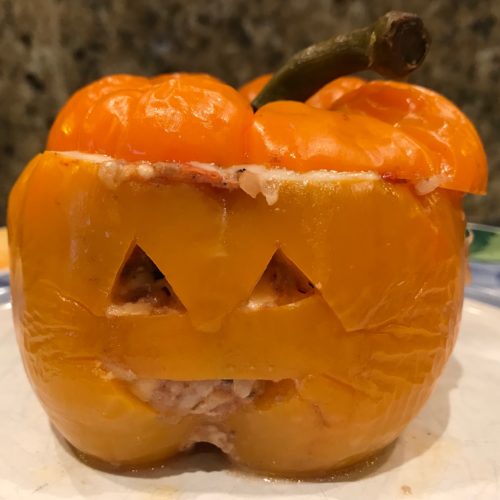
Stick them in the slow cooker for 3 hours on high. What you get is this little fella.

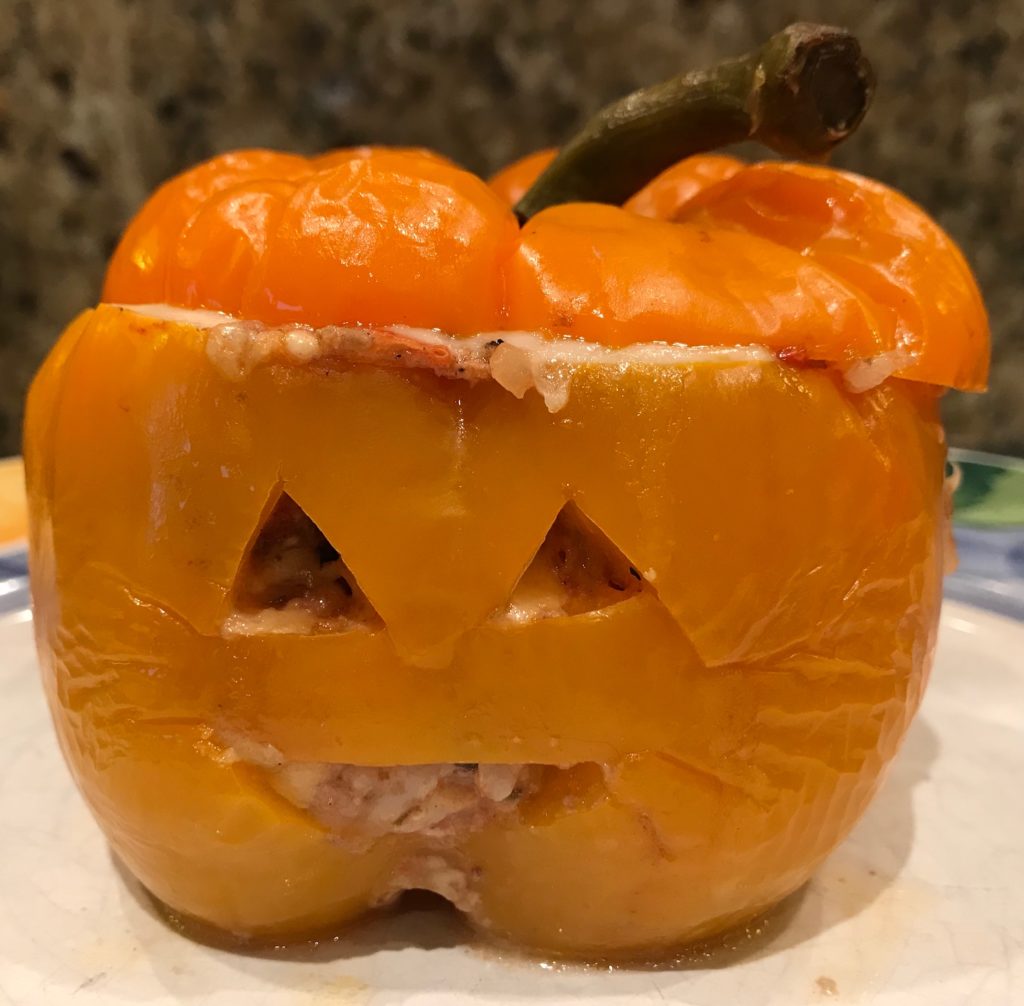
Ok, so he’s not as cute or as spooky as I had hoped. He’s kind of funny looking with rice oozing out of his mouth and looking a bit wrinkly. I did have to chuckle, but frankly, I was disappointed because the pepper was squishy. I want my cute food to taste delicious too. There’s no way these peppers should have been cooking for 3 hours. If I make them again, I would definitely check on them after 2 hours to see if the ground beef was cooked through and the pepper was soft, not mushy. If you make them, let me know how they turned out.

Happy Halloween! Boo!

Slow Cooker Halloween Stuffed Peppers

Slow Cooker Halloween Stuffed Peppers

Servings 4

Ingredients
  

  • 4 orange bell peppers
  • 1 pound lean ground beef
  • 15 ounces fire-roasted diced tomatoes
  • 2 cups shredded jack cheese divided
  • 1 cup white rice cooked
  • 1 1/2 teaspoons salt
  • 1 teaspoon pepper
  • 1 teaspoon garlic powder
  • 1 teaspoon Italian seasonings

Instructions
 

  • Slice the tops of the peppers and keep the green top attached to the cap. Remove the seeds inside. With a small, sharp knife, carve little jack o' lantern on each pepper.
  • In a large bowl, combine beef, 1 cup cheese, tomatoes, rice, salt, pepper, garlic powder, and Italian seasonings. Stir until all ingredients are fully incorporated.
  • Stuff peppers with the beef mixture. Place them in a slow cooker, top side up. Cover and cook on high for 3 hours.
  • When the peppers are tender, top peppers with remaining cheese and cover. Cook on low for 5-10 minutes more, or until cheese melts.
Blog

Beef Stroganoff

Jump to Recipe

This recipe is a favorite in the Deter household. Beef stroganoff is originally a Russian dish with beef sauteed in a sour cream sauce. It’s morphed into a dish that can contain any type of beef, sometimes has mushrooms, and is often served over egg noodles (although I have been known to serve it over cauliflower rice for myself). It’s incredibly retro and there’s absolutely nothing fancy about it.

My recipe has morphed a few times and probably resembles nothing like the traditional stroganoff of the 70s and 80s. First of all, no mushrooms. I happen to like them, but the boys don’t. So don’t even think adding them or using cream of mushroom soup. Mine doesn’t have any nutmeg, but you’ll find a ton of chopped rosemary. More than any normal person might like so feel free to use less. Finally, no beef tips. This one has ground beef.

I’m starting to wonder how this can even be called beef stroganoff, but let’s go with it because it’s tasty and filling and all that good stuff.

It starts out fresh rosemary, garlic, and red onions. It’s so much better with fresh rosemary, but you can use a teaspoon of chopped dried rosemary instead. Just don’t use that jarred minced garlic stuff. Always use fresh garlic. Never mind that it’s annoying to peel and chop.

Chopped these up and add them to your crumbled ground beef that’s been browning. I like to use the leanest beef possible to avoid a pool of grease.

Warning…the following photos you are about to see might seem scary and disgusting. Apparently beef stroganoff is not the supermodel of foods and looks rather unattractive. I swear it tastes better than it looks.

Add cream of chicken soup and some seasonings. Told you that no mushrooms would be harmed in the making of this dish.

Add sour cream and parsley. I use dried parsley, but fresh parsley works really well too.

Cook a little longer, toss with egg noodles, and this is what you end up with.

This recipe makes plenty for six people. Because there’s only three of us, I usually boil half of a bag (8 ounces) of noodles instead of a full bag, and use half of the sauce. Keep the leftover sauce and boil fresh noodles when it’s time for leftovers.

Beef Stroganoff

Beef Stroganoff

Servings 4

Ingredients
  

  • 2 cloves garlic minced
  • 1 tablespoon fresh rosemary chopped finely
  • 1 cup red onions diced
  • 2 teaspoon salt
  • 1/4 teaspoon pepper
  • 1/2 teaspoon paprika
  • 10.5 ounces condensed cream of chicken soup
  • 16 ounces egg noodles cooked
  • 16 ounces sour cream
  • 1 tablespoon dried parsley

Instructions
 

  • Crumble and brown ground beef with garlic, rosemary, and onion.
  • Add salt, pepper, paprika, and soup. Simmer for 5 minutes.
  • Add sour cream and parsley. Simmer until heated through.
  • Mix with cooked noodles and serve.
Blog

Greek Lemon Chicken and Orzo

Jump to Recipe

Sometimes a recipe comes along that you just don’t change because it’s perfect. This is that recipe. I’ve made it several times and each time, it’s amazing. Better yet, it’s super simple. I wish I could take credit, but alas, I can only provide advice. The prize goes to Jeff Mauro, the Sandwich King from The Food Network, who apparently makes a lot more stuff than sandwiches. His recipe combines dill and lemon along with coriander to make a delicious meal.

Start out with fresh dill and grated lemon for your orzo. The flavor meld together nicely and screams Greek. I should try to make a dip with this. And what is orzo, you may ask. It looks like rice, but it’s a pasta that’s often used in salads, but also in casseroles like this one.

For the chicken, you’ll be using different seasonings, but only three (see how simple this recipe is?). In addition to salt and pepper, you’ll use ground coriander. And what is coriander, you may ask. It’s actually the seeds from the cilantro plant. Who knew? They have a citrus flavor when crushed, which is why it pairs well with dill and lemon.

To cut down on the number of bowls you use, combine the orzo mixture directly in the baking dish. Then, rub the seasonings on chicken. It will be peppery so if that’s not your thing, use half the pepper the recipe states.

Choose chicken that with a consistent thickness, meaning not super thick in the middle and skimpy thin at the ends. If this is not possible, consider pounding the chicken with a mallet to thin out the middle. I have found that two breasts per pound works best for me and doesn’t require any pounding. Just be sure to avoid using large breasts or they won’t cook through.

Place the chicken in the orzo mixture. Don’t freak out. The chicken broth will not wash off the chicken seasonings and make the chicken bland. It’ll all turn out in the end. Make sure your chicken is submerged so you don’t end up with dry chicken. Top with lemon.

And let me take a moment to tell you to use chicken stock, not broth. There’s a difference, they are not interchangeable, and you’ll thank yourself for using the right ingredient.

When baked, you’ll end up with this…

And this…

Did I mention how fancy it looks? You probably could pull this dish off when you have guests to impress.

One of these days, I’m going to try making this dish with other seasoning combinations. I’m thinking that tomato sauce, oregano, and cumin with a little chopped green olives might create a Spanish twist while experimenting with orange and parsley will produce an Italian dish. I encourage you to use your favorite seasonings in the orzo and chicken. Let me know what you discover!

Greek Lemon Chicken and Orzo

Greek Lemon Chicken and Orzo

Servings 6

Ingredients
  

Orzo

  • 3 cups chicken stock
  • 3 tablespoons butter melted
  • 2 teaspoons kosher salt
  • 1 teaspoon cornstarch
  • 2 sprigs fresh dill chopped
  • 2 lemons zested and juiced
  • 1 clove garlic minced
  • 2 cups orzo

Chicken

  • 2 teaspoons ground coriander
  • 2 teaspoons kosher salt
  • 2 teaspoons ground black pepper
  • 4 medium chicken breasts boneless, skinless
  • 1 lemon sliced

Instructions
 

  • Preheat the oven to 375 degrees F.
  • For the orzo: In a 9-by-13-inch baking dish, whisk together stock, butter, salt, cornstarch, dill, lemon zest and juice, and garlic. Mix in the orzo.
  • For the chicken: In a small bowl, mix together the coriander, salt and pepper. Coat the chicken all over with the seasoning.
  • Add the chicken breasts, laying them so most of the chicken is submerged. Top with lemon slices.
  • Bake, uncovered, until the chicken registers an internal temperature of 165 degrees F, 35 to 40 minutes. Let rest for 5 minutes.
Blog

Pork Udon Noodles

Jump to Recipe

I’m not good at making Asian food. There. I said it. Maybe it’s not that I’m terrible at it, but for example, take-out is so good. How can I compete? It’s tasty and inexpensive. But I’m determined to win and this time, I’m making a Japanese noodle dish. Here’s my attempt and while I still have a ways to go, this ended up being a really easy weeknight dinner with plenty of leftovers.

I found a promising recipe on Bon Appétit. In general, Bon Appétit has very good, reliable recipes so I trust them. I did change the recipe. I couldn’t find instant udon noodles and I ran out of fresh ginger so I had to adapt a little. I also made it less spicy because of the boys. I made a few other changes, like used more sesame oil and low-sodium soy sauce. If I had to do it over again, I would have used fresh ginger and your standard soy sauce.

I like to prep everything beforehand so I can easily dump ingredients into the pan. For this recipe, slice up some cabbage and green onions. Be sure to separate out the pale and dark parts of the green onion. Stage your white/pale-green onion, ginger, and red pepper flakes in one bowl. Dark green onion parts go in another bowl.

One reason why I like Bon Appétit is that they give you advice in the directions. In this recipe they remind you not to touch the pork so it browns. “The pork will never brown if you’re fussing with it the whole time, so when we say ‘undisturbed,’ that means keep your paws off it and let the heat of the pan and the pork do their thing.” You can’t tell here, but the underside is browned. I swear. I should have taken a picture. Ok, it could have browned a little longer.

While the meat is browning, I boiled 9.5 ounces of udon noodles according to the package. The original recipe calls for 14 ounces so in my version you end up with a higher meat to noodle ratio, which is fine by me. I have no idea where to buy instant udon noodles. I found a surplus of ramen noodles, but not udon. The ones I chose cook in 4 minutes and I was happy with them.

I used mirin, which is an ingredient that I’m not entirely familiar with, and is often used in Japanese cooking. It’s a slightly sweet Japanese cooking wine made from rice and is similar to sake with a lot less alcohol. Bon Appétit has an informative article about what it is and what to do if you can’t find it.

When you’re done, you end up with something like this. It was really simple to make and got two thumbs up.

Pork Udon Noodles

Pork Udon Noodles

Servings 4

Ingredients
  

  • 2 tablespoons vegetable oil divided
  • 4 cups green cabbage coarsely chopped
  • 9.5 ounces udon noodles
  • 3 teaspoons sesame oil
  • 10 ounces ground pork
  • 5 green onions green and pale parts separated
  • 1/2 teaspoon ground ginger
  • 1/2 teaspoon red pepper flakes
  • 1/3 cup mirin
  • 1/3 cup soy sauce low sodium

Instructions
 

  • Heat 1 tablespoon of vegetable oil in a large skillet over medium-high heat. Add cabbage and cook, tossing often, until edges are browned, about 4 minutes. Reduce heat to low and continue to cook, tossing often, until thickest parts of cabbage leaves are tender, about 4 minutes longer. Remove from pan and place on a separate plate. Set aside.
  • Heat remaining tablespoon of vegetable oil in same skillet over medium-high heat. Add pork, breaking up and spreading across surface of pan with a spatula or tongs. Cook pork, undisturbed, until underside is brown, about 3 minutes. When pork is browned, break up meat into small bits. Cook, tossing, just until there’s no more pink, about 1 minute.
  • While the meat is browning (and you're not touching it), boil udon noodles according to the package. Drain in a colander. Transfer noodles to a bowl and toss with sesame oil.
  • To your meat mixture, add the pale parts of the chopped green onions, ginger, and red pepper. Continue to cook, tossing often, until green onions are softened and the bottom of skillet is starting to brown, about 1 minute.
  • Add cabbage, udon noodles, mirin, and soy sauce. Cook, tossing constantly, until noodles are coated in sauce (be sure to scrape bottom of skillet to dissolve any browned bits), about 45 seconds.
  • Remove from heat. Top with dark-green parts of scallions and serve.
Blog

Fish Tacos

Jump to Recipe

It’s been a difficult week and because of it, I’m posting only one recipe this weekend. Without going into the politics, PG&E cut power to over 700,000 households and we were one of them. Lucky us. So, yes, I could have cooked in the dark, pretended it was like camping, and roughed it. But frankly, I was not in the best mood so we went out to dinner instead. And again.

Two days later, the power was back on, but it took another two days to restore Internet and TV services. ARGH. In the meantime, I was busy throwing away half my fridge with all my food blog recipe ingredients. I have no idea how those off-the-grid people survive. Oh, wait, yes….they have a generator. We do not. Because we live in suburbs, not the country. Where the power should never go out for more than a few hours. Ok, calm down, Flora.

Enough of feeling sorry for myself. It’s time to treat myself to my favorite food: tacos.

Almost every Tuesday, we have tacos. I love tacos. No really. I’m not kidding when I say I love tacos. When I went to Houston in August, I ate tacos 4 days in a row. I still miss those tacos.

So as part of my recovery, I decided to make fish tacos. Yummy, slightly spicy, comforting tacos.

Here are the seasonings and breading. If you don’t like any crunch, use all flour instead of a panko blend. Later you’ll use an egg wash to get the breading to stick, but you can skip that too for a softer exterior. I wanted mine to have a slight crunch to mimic deep fried fish. This recipe is totally healthier than that.

I used cod, which is fairly reasonably priced compared to other fish, but you can use tilapia, which is a little cheaper, or upgrade to halibut. Any white fish will do.

To get the breading to stick, I like to use an egg wash, which is really just an egg whisked so the whites and yolks are mixed together. I also like to use tongs or a fork to dip the fish and then into the breading. It makes a lot less mess on your fingers. And if you have long nails, trust me when I say you do not want to use your hands.

The fish doesn’t need to be perfectly coated because they come out tasty no matter what, and you might want to break the fish apart in your taco anyway. Just make sure to shake off any excess breading. It’ll help prevent the breading from falling off your fish when you fry it.

If you haven’t already, buy yourself a cast-iron pan. You’ll use it over and over again for lots of recipes, like Cast Iron Pizza. Although non-stick pans and stainless steel serve their purpose, cast iron pans are durable, non-stick, and last forever. Just don’t drop it on your foot. They are incredibly heavy. Ouch.

Also invest in a fish spatula. It’s like your typical spatula but longer and curved, which makes it so much easier to flip stuff like fish, but it works on any meat, including chicken and beef. There’s nothing more frustrating than doing everything right, but not having the right equipment. It’s like using a bicycle when you really need a car. Or something like that.

When you heat up the olive oil, I like to put a timer on it. What seems like 3 minutes ends up being only 1 minute, and you really need to heat up the oil to the correct temperature so you don’t end up with soggy fish. I usually heat the oil on medium heat for about 3 minutes. Some say to look for a slight shimmering of the oil, but my eyes just don’t see that very well (no, I’m not old…just blind, apparently). Instead, I throw a bit of breading into the pan and if it sizzles, it’s ready.

Turn the temperature down slightly. I find that the pan continues to heat up, and I don’t want that or I’ll end up with burnt fish. Place one piece of fish in the pan. If it sizzles, the temperature is perfect. If it doesn’t wait another 30 seconds or so before adding the next piece.

When you add all your fish, make sure they aren’t touching. Overcrowding causes more moisture than you want so your fish ends up sauteing instead of frying. Resist the temptation to squeeze all your fish pieces into one pan. Just fry it in two batches instead.

Cook for about 3-5 minutes on each side. If it’s a steak or thicker cut, go for 4 or 5 minutes. If it’s a filet or thinner cut, go for 3 minutes. Whatever you do, do not poke and prod the fish. Let it cook. Flipping it over and over messes everything up. Trust me on this.

If you’ve followed these guidelines, your fish should not stick to the pan when you flip it. Carefully nudge your fish a little to check. If it’s stuck or doesn’t give freely, it’s not ready yet. Give it another 30 seconds to a minute. Those bread crumbs haven’t cooked enough to release from the pan. If you flip it too soon, you’ll end up with your breading stuck to the pan, not to your fish. When you flip it, the fish should look golden brown.

Place fish on tortillas and add your favorite toppings. Yum…happiness.

Fish Tacos

Fish Tacos

Servings 4

Ingredients
  

  • corn or flour tortillas your favorite size
  • 1 egg beaten
  • 1/4 cup all-purpose flour
  • 1/4 cup panko breadcrumbs
  • 2 teaspoons chili powder
  • 1 teaspoon kosher salt plus more for seasoning
  • 2 teaspoons ground black pepper plus more for seasoning
  • 1 pound skinless white fish such as cod, halibut, tilapia, etc.
  • 2 tablespoons olive oil
  • your favorite toppings: crema, sour cream, lime juice, red onions, shredded cabbage, cilantro, avocado, pico de gallo, salsa, hot sauce, etc.

Instructions
 

  • Whisk an egg in a small bowl. Set aside.
  • Stir together flour, panko, chili powder, salt, and pepper in a shallow bowl. Set aside.
  • Using tongs, a fork, or your fingers, dip fish into the egg wash and then coat with the flour mixture.
  • Heat the oil in a cast iron (or non-stick) pan over medium heat until the oil is shimmering. Add the fish to the pan without crowding the fish. Cook the fish for about 3 to 5 minutes until it's cooked halfway through the sides. The bottom should be golden brown and not stick to the pan. Wait another 30 seconds and check again before flipping.
  • Using a fish spatula, flip the fish over. Add more oil if the pan looks dry. Cook for another 3 to 5 minutes until it flakes.
  • Warm up the tortillas in a pan or microwave. Add fish to tortillas, breaking pieces apart if needed. Add toppings and serve.
Blog

Instant Pot Spaghetti and Meatballs

Jump to Recipe

I love my Instant Pot. Seriously. Yes, I also love my KitchenAid mixer, my grill pan, my Crock-Pot, my apple peeler/slicer/corer, etc. but I REALLY love my Instant Pot. I would have never attempted pressure cooking without it. I wouldn’t say using it cuts cooking time in half, but between the way it tenderizes tough cuts of meat and that it’s such a cool gadget, what’s not to love? It’s sort of magical. In goes something and out comes something else. It just makes life easier in so many ways.

Like spaghetti and meatballs. I’ve seen Instant Pot pasta recipes and many swear by them, but I wasn’t all that impressed. Boiling over the stove is still faster. But throw in meatballs and that’s a game changer.

Meatballs are time consuming. Working with raw meat that is best mixed up with your hands, but not too much or your meatballs will end up hard like golf balls. Forming a few dozen of them into perfect shaped balls. I’d rather be making cookies, frankly. Frying them in batches in a pan…ok, I did find this awesome Roasted Italian Meatball recipe by The Barefoot Contessa that is out of this world and cuts out the frying part. But it’s still a lot of work and sometimes I wonder if it’s worth it. Making a beef sauce is so much easier.

But there’s something about spaghetti and meatballs that reminds me of a simpler time.

On top of spaghetti,
All covered with cheese,
I lost my poor meatball
When somebody sneezed.

It rolled off the table
And onto the floor,
And then my poor meatball
Rolled right out the door

But I digress. Back to the Instant Pot. I’ve made Instant Pot pasta. I’ve made Instant Pot meatballs. Now I make them together.

I couldn’t find a recipe so I made up my own.

First, peel and mince your garlic. Let’s talk about peeling garlic. I know there are a million and one garlic peelers on the market, but you only need one. Your knife. I swear it’s true. I like using a cleaver, but any wide knife will do. Just vent your frustrations of the day by pressing down hard on each clove of garlic to smash it to smithereens. They’ll look like this and you’ll be able to easily peel the papery thin skins off the garlic with no trouble at all.

Add your minced garlic, shallots, egg, cheese, breadcrumbs, milk, and seasonings to a large bowl.

Let’s take a moment to talk about the shallot. I like shallots. In my opinion, they are underused. When you don’t want the sharpness of onions, use shallots, which are milder, sweeter, and are reminiscent of garlic. And one can never have too much garlic so shallots are a perfect compliment to garlic.

Add your ground meats (you’ll be using both ground beef and sausage). Mix it all up with your hands. No, you can’t get around that. All power to you if you use a cooking spoon or fork, but I never get the right results. Next, form into balls until you have about about a dozen. They might seem a little sticky, but that’s ok.

Pour the water and sauce in. If you like a thicker sauce, use more than a jar of sauce. Gently place your meatballs in your Instant Pot, without stacking them, but they can touch a little. The point is to make sure the meatballs are covered with liquid. Next, disregard the cardinal rule of making spaghetti: break the strands in half. I don’t know who made up this rule, but professional chefs on those cooking shows seem to frown on that. Whatever. Just listen to me. This won’t work unless the pasta is flat in the pot.

Add more water. And whatever you do, resist the temptation to stir! Seal the lid and cook. When it’s done, open it up and now you can stir.

What I like best about this recipe is that the mess is contained to one pot and you don’t need to babysit sauce, meatballs, and pasta. Dinner is served!

Instant Pot Spaghetti and Meatballs

Instant Pot Spaghetti and Meatballs

Servings 4

Ingredients
  

  • 1/2 shallot finely diced
  • 1 large egg beaten
  • 2 cloves garlic minced
  • 1/2 pound lean ground beef
  • 4 ounces uncooked ground Italian sausage
  • 1/4 cup Parmesan cheese finely grated
  • 1/2 cup dry breadcrumbs
  • 1/4 cup milk
  • 1 teaspoon kosher salt
  • 1 teaspoon Italian seasonings
  • 2 cups water divided
  • 24 ounces marinara pasta sauce
  • 8 ounces dry spaghetti
  • grated Parmesan cheese for serving

Instructions
 

  • Lightly beat an egg in a large bowl. Mince garlic cloves and grate Parmesan cheese. Add both to the bowl. Add breadcrumbs, milk, kosher salt, and Italian seasoning. Add the ground beef and sausage to the bowl. 
  • Gently mix with your hands until well combined. Form and shape into 12 meatballs (about 2 tablespoons each). Set aside. 
  • Add 1/2 cup of water and sauce to the pot. Stir to combine. Add meatballs to the bottom without stacking them and with minimal touching.
  • Break the spaghetti in half and spread them in two layers over the meatballs. Do not stir.
  • Pour the remaining 1 1/2 cups of water over the pasta. Remember not to stir.
  • Seal the Instant Pot. Set to cook on HIGH pressure for 8 minutes.
  • Open the pressure release valve (quick release) as soon as the 8 minutes are up. Open the pressure cooker and stir the spaghetti into the sauce. Serve with grated Parmesan cheese.
Blog

Grilled Pork Chops with Spiced Pears

Jump to Recipe

I love pork chops so when a good friend of mine passed on this recipe, I jumped at it. The recipe was super easy. You’ll find it on Favorite Family Recipes. I also found the recipe to be missing some key information so I’ll fill in the blanks for you.

This recipe calls for a lot of seasonings, which make the chops very flavorful. Don’t skip out on any of them. After you mix them up, be sure to taste to make sure they are to your liking. Add more salt if you don’t think it’s salty enough. Add more chili powder for more spice.

Then rub them over 1/2-inch thick chops. I wasn’t in the mood to get my fingers tinged with red chili powder. Instead, I spooned a heaping teaspoon over each side and rubbed it in with the back of my spoon. My trick seemed to work pretty well.

The original recipe called for grilling these outside, but once again, I was feeling lazy this particular evening so instead of running back and forth, or camping out over the hot BBQ, I used my nifty grill pan, which I love in every way possible. This was a present to myself and I don’t regret it for one single second. Except when I have to clean the damn thing. But that’s a story for another day.

While the chops are grilling, dice up some pears. I chose ones that were slightly under ripe because I didn’t want mushy pear sauce.

Add the pears to a saucepan, and add vinegar and spices. I found that this recipe makes an excessive amount of very tangy pear sauce. Just my opinion. Next time I’d use less vinegar and more brown sugar. Maybe a little less cinnamon too.

While all this pear saucing is going on, don’t forget about your chops. You need to flip them after 3 minutes and then 2 minutes on the other side. No one wants a tough, leathery pork chop. These turned out nicely with those grill marks I love to see. Yet another reason why the grill pan is a beautiful thing.

Spoon the pears sauce over your pork chop. The younger boy thought this was just wrong so feel to skip it if you aren’t into it.

Pretty easy for a weeknight dinner. The recipe below adds some crucial information about cook times and stuff.

Grilled Pork Chops with Spiced Pears

Grilled Pork Chops with Spiced Pear Sauce

Servings 8

Ingredients
  

Pork Rub

  • 1 1/2 pounds pork chops 1/2 inch thick, about 8-10 chops
  • 1/4 cup brown sugar packed
  • 1 tablespoon chili powder
  • 1 teaspoon cinnamon
  • 1 teaspoon garlic powder
  • kosher salt and freshly ground pepper to taste

Pear Sauce

  • 3 pears peeled and diced
  • 1/3 cup apple cider vinegar
  • 1 tablespoon water
  • 1/2 cup brown sugar packed
  • 1/2 teaspoon ground ginger
  • 1/2 teaspoon chili powder
  • 1/2 teaspoon cinnamon
  • kosher salt to taste

Instructions
 

Pork Chops

  • Mix together pork rub ingredients and taste. Coat each pork chop with the rub on each side.
  • Let the pork chops sit at room temperature for about 20 minutes before grilling.
  • Heat up grill pan to medium heat.
  • Grill on 3 minutes on one side. Flip. Grill for 2 minutes on the other side.
  • Remove from heat and let them rest for 5 minutes before serving.

Pear Sauce

  • Combine all ingredients for pear sauce in a small saucepan over medium heat.
  • Cook for about 12 minutes until pears are soft and the sauce has thickened slightly to coat pears.
  • Serve the pork chops with sauce spooned on top.